


Alist/S3/阿里ossz制作随机图片api
本文最后更新于 2026-02-01,文章内容可能已经过时。
Alist/S3/阿里ossz制作随机图片api
本教程采用php作为基础框架,实现通过对象存储随机返回图像从事实现
- AWS S3 协议
- 阿里云OSS
- .....(等待开发)
如果不想继续研究,可以参考一键安装程序
在需要安装的目录下新建install.php文件复制下面内容至文件
然后浏览器访问 http(s)://domain/install.php 进行安装
<?php
// install.php - 完整安装引导程序(自动生成文件+代码)

// 检查是否已安装
if (file_exists('config.php') && !isset($_GET['force'])) {
    showError('系统已安装,如需重新安装请访问 '.$_SERVER['PHP_SELF'].'?force');
    exit;
}

// 处理表单提交
if ($_SERVER['REQUEST_METHOD'] === 'POST') {
    try {
        // 验证输入
        $required = ['storageType', 'bucketName', 'endpoint'];
        foreach ($required as $field) {
            if (empty($_POST[$field])) {
                throw new Exception("请填写所有必填字段");
            }
        }

        // 自动生成所有文件
        generateFiles($_POST);

        // 显示安装成功页面
        showSuccess();

    } catch (Exception $e) {
        showError($e->getMessage());
    }
    exit;
}

// 显示安装表单
showForm();

// ============= 核心功能函数 =============

/**
 * 生成所有必要文件
 */
function generateFiles($config) {
    // 1. 生成配置文件
    $configContent = generateConfig($config);
    if (!file_put_contents('config.php', $configContent)) {
        throw new Exception("无法写入配置文件");
    }

    // 2. 生成核心文件
    $files = [
        'index.php' => '<?php include \'backend.php\';',
        'backend.php' => generateBackendCode(),
        'error.php' => '<?php header("Content-Type: application/json"); echo json_encode(["error"=>true,"message"=>$message??"Error"]);',
        'composer.json' => generateComposerJson()
    ];

    foreach ($files as $file => $content) {
        if (!file_put_contents($file, $content)) {
            throw new Exception("无法写入文件: $file");
        }
    }

    // 3. 创建vendor目录
    if (!file_exists('vendor')) {
        mkdir('vendor', 0755, true);
    }
}

/**
 * 生成配置文件内容
 */
function generateConfig($post) {
    return '<?php
return [
    \'storageType\' => '.intval($post['storageType']).',
    \'checkDevice\' => '.($post['checkDevice'] === 'true' ? 'true' : 'false').',

    \'s3Config\' => [
        \'bucketName\' => \''.addslashes($post['bucketName']).'\',
        \'region\' => \''.addslashes($post['region'] ?? 'auto').'\',
        \'endpoint\' => \''.addslashes($post['endpoint']).'\',
        \'accessKeyId\' => \''.addslashes($post['accessKeyId'] ?? '').'\',
        \'accessKeySecret\' => \''.addslashes($post['accessKeySecret'] ?? '').'\',
    ],

    \'ossConfig\' => [
        \'bucketName\' => \''.addslashes($post['bucketName']).'\',
        \'endpoint\' => \''.addslashes($post['endpoint']).'\',
        \'accessKeyId\' => \''.addslashes($post['accessKeyId'] ?? '').'\',
        \'accessKeySecret\' => \''.addslashes($post['accessKeySecret'] ?? '').'\',
    ]
];';
}

/**
 * 生成后端代码
 */
function generateBackendCode() {
    return '<?php
require __DIR__.\'/vendor/autoload.php\';
$config = require __DIR__.\'/config.php\';

use Aws\S3\S3Client;
use OSS\OssClient;

try {
    $prefix = $config[\'checkDevice\'] ? (isMobile() ? \'mobile/\' : \'desktop/\') : \'\';

    if ($config[\'storageType\'] == 1) {
        $s3 = new S3Client([
            \'version\' => \'latest\',
            \'region\' => $config[\'s3Config\'][\'region\'],
            \'endpoint\' => $config[\'s3Config\'][\'endpoint\'],
            \'use_path_style_endpoint\' => true,
            \'credentials\' => [
                \'key\' => $config[\'s3Config\'][\'accessKeyId\'],
                \'secret\' => $config[\'s3Config\'][\'accessKeySecret\']
            ]
        ]);

        $result = $s3->listObjectsV2([
            \'Bucket\' => $config[\'s3Config\'][\'bucketName\'],
            \'Prefix\' => $prefix
        ]);

        $images = array_filter($result[\'Contents\']??[], function($f) {
            $ext = strtolower(pathinfo($f[\'Key\'], PATHINFO_EXTENSION));
            return in_array($ext, [\'jpg\',\'jpeg\',\'png\',\'gif\',\'webp\']);
        });

        $image = $images[array_rand($images)] ?? null;
        if (!$image) throw new Exception("No images found");

        $object = $s3->getObject([
            \'Bucket\' => $config[\'s3Config\'][\'bucketName\'],
            \'Key\' => $image[\'Key\']
        ]);

        header(\'Content-Type: \'.$object[\'ContentType\']);
        echo $object[\'Body\'];

    } else {
        $oss = new OssClient(
            $config[\'ossConfig\'][\'accessKeyId\'],
            $config[\'ossConfig\'][\'accessKeySecret\'],
            $config[\'ossConfig\'][\'endpoint\']
        );

        $list = $oss->listObjects($config[\'ossConfig\'][\'bucketName\'], [
            \'prefix\' => $prefix,
            \'max-keys\' => 100
        ]);

        $images = [];
        foreach ($list->getObjectList() as $obj) {
            $ext = strtolower(pathinfo($obj->getKey(), PATHINFO_EXTENSION));
            if (in_array($ext, [\'jpg\',\'jpeg\',\'png\',\'gif\',\'webp\'])) {
                $images[] = $obj->getKey();
            }
        }

        $image = $images[array_rand($images)] ?? null;
        if (!$image) throw new Exception("No images found");

        header(\'Content-Type: \'.$oss->getObjectMeta(
            $config[\'ossConfig\'][\'bucketName\'],
            $image
        )[\'content-type\']);
        echo $oss->getObject($config[\'ossConfig\'][\'bucketName\'], $image);
    }

} catch (Exception $e) {
    header("Content-Type: application/json");
    http_response_code(500);
    echo json_encode([\'error\' => $e->getMessage()]);
}

function isMobile() {
    return preg_match(\'/(android|iphone|ipad|mobile)/i\', $_SERVER[\'HTTP_USER_AGENT\']);
}';
}

/**
 * 生成composer.json
 */
function generateComposerJson() {
    return '{
    "require": {
        "aws/aws-sdk-php": "^3.0",
        "aliyuncs/oss-sdk-php": "^2.0"
    },
    "config": {
        "optimize-autoloader": true,
        "sort-packages": true
    }
}';
}

/**
 * 显示安装表单
 */
function showForm() {
    echo <<<'HTML'
<!DOCTYPE html>
<html lang="zh-CN">
<head>
    <meta charset="UTF-8">
    <meta name="viewport" content="width=device-width, initial-scale=1.0">
    <title>随机图片API安装向导</title>
    <link href="https://cdn.jsdelivr.net/npm/@picocss/pico@2/css/pico.min.css" rel="stylesheet">
    <link rel="stylesheet" href="https://cdn.jsdelivr.net/npm/@tabler/icons-webfont@latest/tabler-icons.min.css">
    <style>
        :root { --spacing: 1rem; --border-radius: 0.5rem; }
        body { display: flex; min-height: 100vh; align-items: center; background: linear-gradient(135deg, #f5f7fa 0%, #c3cfe2 100%); }
        .install-container { background: white; border-radius: var(--border-radius); box-shadow: 0 10px 30px rgba(0,0,0,0.1); width: 100%; max-width: 800px; margin: 0 auto; overflow: hidden; }
        .install-header { background: linear-gradient(135deg, #6366f1 0%, #7c3aed 100%); color: white; padding: 2rem; text-align: center; }
        .install-body { padding: 2rem; }
        .form-grid { display: grid; grid-template-columns: 1fr 1fr; gap: 1rem; }
        .full-width { grid-column: span 2; }
        .input-hint { font-size: 0.85em; color: #64748b; margin-top: 0.25rem; display: flex; align-items: center; gap: 0.5rem; }
        .input-hint i { font-size: 1.1em; }
        .radio-tabs { display: flex; gap: 0.5rem; margin-bottom: 1rem; }
        .radio-tabs label { flex: 1; text-align: center; padding: 0.75rem; background: #f1f5f9; border-radius: var(--border-radius); cursor: pointer; transition: all 0.2s; }
        .radio-tabs input:checked + label { background: #6366f1; color: white; }
        .manual-install { background: #f8f9fa; padding: 1.5rem; border-radius: var(--border-radius); margin-top: 2rem; }
        pre { background: #1e293b; color: white; padding: 1rem; border-radius: var(--border-radius); overflow: auto; }
    </style>
</head>
<body>
    <div class="install-container">
        <div class="install-header">
            <h1><i class="ti ti-photo"></i> 随机图片API安装向导</h1>
            <p>自动生成所有必要文件</p>
        </div>

        <div class="install-body">
            <form method="post">
                <!-- 存储类型 -->
                <div class="full-width">
                    <h3 style="margin-top: 0;"><i class="ti ti-database"></i> 存储类型</h3>
                    <div class="radio-tabs">
                        <input type="radio" id="storageS3" name="storageType" value="1" checked>
                        <label for="storageS3"><i class="ti ti-brand-aws"></i> S3协议</label>

                        <input type="radio" id="storageOSS" name="storageType" value="2">
                        <label for="storageOSS"><i class="ti ti-brand-alipay"></i> 阿里云OSS</label>
                    </div>
                </div>

                <!-- 存储配置 -->
                <h3 style="margin-top: 1.5rem;"><i class="ti ti-settings"></i> 存储配置</h3>
                <div class="form-grid">
                    <label>
                        存储桶名称
                        <input type="text" name="bucketName" required placeholder="例如: my-images">
                        <div class="input-hint">
                            <i class="ti ti-info-circle"></i>
                            <span id="bucketHint">在Alist/OSS中创建的存储桶名称</span>
                        </div>
                    </label>

                    <label>
                        服务端点
                        <input type="text" name="endpoint" required placeholder="例如: http://alist.example.com:5244" id="endpointInput">
                        <div class="input-hint">
                            <i class="ti ti-info-circle"></i>
                            <span id="endpointHint">S3服务地址,包含http://和端口</span>
                        </div>
                    </label>

                    <label>
                        区域
                        <input type="text" name="region" placeholder="例如: auto 或 us-east-1" value="auto">
                        <div class="input-hint">
                            <i class="ti ti-info-circle"></i>
                            <span>大多数S3兼容服务使用"auto"</span>
                        </div>
                    </label>

                    <label>
                        访问密钥ID
                        <input type="text" name="accessKeyId" placeholder="可选,如果需要认证">
                        <div class="input-hint">
                            <i class="ti ti-info-circle"></i>
                            <span id="keyIdHint">Alist可在"对象存储"设置中找到</span>
                        </div>
                    </label>

                    <label>
                        访问密钥
                        <input type="password" name="accessKeySecret" placeholder="可选,如果需要认证">
                        <div class="input-hint">
                            <i class="ti ti-info-circle"></i>
                            <span>与访问密钥ID配对使用</span>
                        </div>
                    </label>
                </div>

                <!-- 功能选项 -->
                <h3 style="margin-top: 1.5rem;"><i class="ti ti-feather"></i> 功能选项</h3>
                <div class="form-grid">
                    <div class="full-width">
                        <label>
                            <input type="checkbox" name="checkDevice" value="true" checked>
                            根据设备类型自动选择图片
                            <div class="input-hint">
                                <i class="ti ti-info-circle"></i>
                                <span>启用后需要在存储桶创建<strong>mobile/</strong>和<strong>desktop/</strong>目录</span>
                            </div>
                        </label>
                    </div>
                </div>

                <div class="grid" style="margin-top: 2rem;">
                    <button type="submit" class="contrast">
                        <i class="ti ti-download"></i> 生成文件并安装
                    </button>
                </div>
            </form>

            <div class="manual-install">
                <h3><i class="ti ti-terminal"></i> 安装后操作</h3>
                <p>安装完成后需要手动执行以下命令:</p>
                <pre id="installCommands">
# 进入项目目录
cd /安装路径

# 安装依赖
composer install

# 设置权限 (Linux)
chmod -R 755 .
chown -R www-data:www-data .</pre>
                <div class="input-hint">
                    <i class="ti ti-info-circle"></i>
                    <span>完成后访问 <a href="index.php">index.php</a> 测试API</span>
                </div>
            </div>
        </div>
    </div>

    <script>
        // 动态更新提示信息
        function updateHints() {
            const isS3 = document.getElementById('storageS3').checked;

            document.getElementById('bucketHint').textContent = isS3
                ? '在Alist中创建的存储桶名称 (如: my-images)'
                : '阿里云OSS控制台中的Bucket名称 (如: oss-bucket)';

            document.getElementById('endpointHint').textContent = isS3
                ? 'S3服务地址 (格式: http://域名或IP:端口,如: http://127.0.0.1:5244)'
                : '阿里云OSS端点 (格式: oss-cn-地区.aliyuncs.com,如: oss-cn-beijing.aliyuncs.com)';

            document.getElementById('endpointInput').placeholder = isS3
                ? '例如: http://alist.example.com:5244'
                : '例如: oss-cn-shanghai.aliyuncs.com';

            document.getElementById('keyIdHint').textContent = isS3
                ? 'Alist后台"对象存储"中生成的Access Key'
                : '阿里云RAM用户创建的AccessKey ID';
        }

        document.querySelectorAll('input[name="storageType"]').forEach(radio => {
            radio.addEventListener('change', updateHints);
        });

        // 初始化提示
        updateHints();
    </script>
</body>
</html>
HTML;
}

/**
 * 显示安装成功页面
 */
function showSuccess() {
    echo <<<'HTML'
<!DOCTYPE html>
<html lang="zh-CN">
<head>
    <meta charset="UTF-8">
    <meta name="viewport" content="width=device-width, initial-scale=1.0">
    <title>安装成功</title>
    <link href="https://cdn.jsdelivr.net/npm/@picocss/pico@2/css/pico.min.css" rel="stylesheet">
    <link rel="stylesheet" href="https://cdn.jsdelivr.net/npm/@tabler/icons-webfont@latest/tabler-icons.min.css">
    <style>
        body { display: flex; min-height: 100vh; align-items: center; background: linear-gradient(135deg, #f5f7fa 0%, #c3cfe2 100%); }
        .success-container { background: white; max-width: 800px; margin: 0 auto; padding: 2rem; border-radius: 0.5rem; box-shadow: 0 10px 30px rgba(0,0,0,0.1); text-align: center; }
        .success-icon { font-size: 5rem; color: #22c55e; margin-bottom: 1rem; }
        .manual-install { background: #f8f9fa; padding: 1.5rem; border-radius: 0.5rem; margin-top: 2rem; text-align: left; }
        pre { background: #1e293b; color: white; padding: 1rem; border-radius: 0.5rem; overflow: auto; }
    </style>
</head>
<body>
    <div class="success-container">
        <div class="success-icon">
            <i class="ti ti-circle-check"></i>
        </div>
        <h1>文件生成成功!</h1>
        <p class="lead">已自动创建所有必要的代码文件</p>

        <div class="manual-install">
            <h3><i class="ti ti-terminal"></i> 需要手动完成以下操作</h3>
            <p>通过SSH执行以下命令安装依赖:</p>
            <pre>
# 进入项目目录
cd /安装目录

# 安装Composer

# 安装依赖
composer install

# 设置权限 (Linux)
chmod -R 755 .
chown -R www-data:www-data .</pre>
            <div class="grid" style="margin-top: 2rem;">
                <a href="./" class="secondary">
                    <i class="ti ti-home"></i> 返回首页
                </a>
                <a href="index.php" class="contrast">
                    <i class="ti ti-api"></i> 测试API
                </a>
            </div>
        </div>
    </div>
</body>
</html>
HTML;
}

/**
 * 显示错误页面
 */
function showError($message) {
    echo <<<HTML
<!DOCTYPE html>
<html lang="zh-CN">
<head>
    <meta charset="UTF-8">
    <meta name="viewport" content="width=device-width, initial-scale=1.0">
    <title>安装错误</title>
    <link href="https://cdn.jsdelivr.net/npm/@picocss/pico@2/css/pico.min.css" rel="stylesheet">
    <link rel="stylesheet" href="https://cdn.jsdelivr.net/npm/@tabler/icons-webfont@latest/tabler-icons.min.css">
    <style>
        body { display: flex; min-height: 100vh; align-items: center; background: linear-gradient(135deg, #f5f7fa 0%, #c3cfe2 100%); }
        .error-container { background: white; max-width: 800px; margin: 0 auto; padding: 2rem; border-radius: 0.5rem; box-shadow: 0 10px 30px rgba(0,0,0,0.1); }
        .error-icon { font-size: 3rem; color: #ef4444; margin-bottom: 1rem; }
    </style>
</head>
<body>
    <div class="error-container">
        <div class="error-icon">
            <i class="ti ti-alert-circle"></i>
        </div>
        <h1>安装过程中出现错误</h1>
        <div class="alert alert-error">
            <p>{$message}</p>
        </div>
        <div class="grid" style="margin-top: 2rem;">
            <a href="{$_SERVER['PHP_SELF']}" class="secondary">
                <i class="ti ti-arrow-back"></i> 返回重试
            </a>
            <a href="{$_SERVER['PHP_SELF']}?force" class="contrast">
                <i class="ti ti-refresh"></i> 强制重新安装
            </a>
        </div>
    </div>
</body>
</html>
HTML;
}
目录结构
/auto-pic-api
    ├── index.php  		#入口文件
    ├── vendor/    		#sdk文件
    ├── error.php		#异常报错
    ├── config.php		#配置文件
    ├── backend.php		#主程序脚本
    ├── composer.lock   #默认不存在,但是运行完composer install就会生成,不需要删除
    └── composer.json
index.php
<?php include 'backend.php';
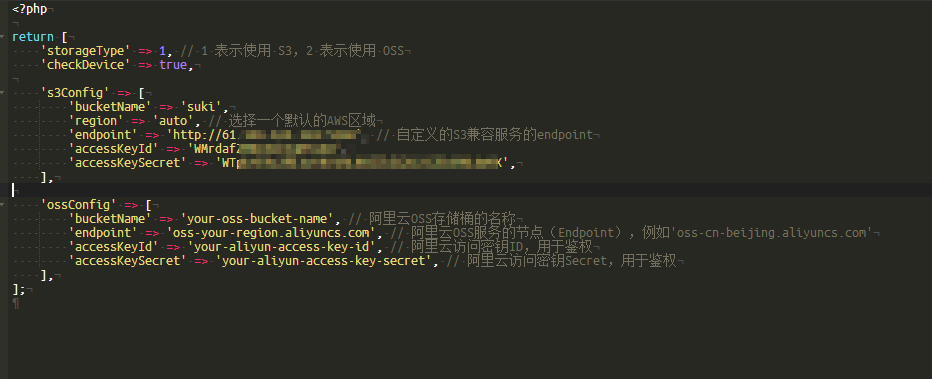
config.php中配置文件
根据注解提示更改相应内容
<?php

return [
    'storageType' => 1, // 1 表示使用 S3,2 表示使用 OSS
    'checkDevice' => false,

    's3Config' => [
        'bucketName' => 'your-s3-bucket-name', // S3存储桶的名称
        'region' => 'auto', // S3存储桶所在的AWS区域,默认为'auto',例如'us-east-1'
        'endpoint' => '访问ip/域名', // 自定义的S3兼容服务的endpoint,如果是域名,需要绑定s3的端口!
        'accessKeyId' => 'your-aws-access-key-id', // AWS访问密钥ID,用于鉴权
        'accessKeySecret' => 'your-aws-secret-access-key', // AWS访问密钥Secret,用于鉴权
    ],

    'ossConfig' => [
        'bucketName' => 'your-oss-bucket-name', // 阿里云OSS存储桶的名称
        'endpoint' => 'oss-your-region.aliyuncs.com', // 阿里云OSS服务的节点(Endpoint),例如'oss-cn-beijing.aliyuncs.com'
        'accessKeyId' => 'your-aliyun-access-key-id', // 阿里云访问密钥ID,用于鉴权
        'accessKeySecret' => 'your-aliyun-access-key-secret', // 阿里云访问密钥Secret,用于鉴权
    ],
];
backend.php程序文件
注:这一部分没有代码经验的不推荐自行更改
<?php

require __DIR__ . '/vendor/autoload.php';

// 从 config.php 读取配置
$config = require __DIR__ . '/config.php';

use OSS\OssClient;
use OSS\Core\OssException;
use Aws\S3\S3Client;
use Aws\Exception\AwsException;

// 提取配置项
$storageType = $config['storageType'];  // 读取存储类型,1 表示 S3,2 表示 OSS
$checkDevice = $config['checkDevice'];  // 是否根据设备类型选择不同的图片前缀
$s3Config = $config['s3Config'];  // S3 配置
$ossConfig = $config['ossConfig'];  // OSS 配置

// 根据设备类型选择图片前缀
$imagePrefix = '';
if ($checkDevice) {
    $imagePrefix = isMobile() ? '/mobile' : '/desktop';
}

// 判断当前设备是否为移动设备
function isMobile()
{
    return preg_match('/(android|iphone|ipad|mobile)/i', $_SERVER['HTTP_USER_AGENT']);
}

// 根据存储类型获取随机图片
function fetchImage($storageType, $s3Config, $ossConfig, $imagePrefix)
{
    if ($storageType == 1) {  // 如果 storageType 为 1,则使用 S3
        // 提取 S3 配置信息
        $bucketName = $s3Config['bucketName'];
        $region = $s3Config['region'];
        $accessKeyId = $s3Config['accessKeyId'];
        $accessKeySecret = $s3Config['accessKeySecret'];

        try {
            // 创建 S3 客户端实例
            $s3Client = new S3Client([
                'region' => $region,
                'version' => 'latest',
                'endpoint' => $s3Config['endpoint'],
                'use_path_style_endpoint' => true,
                'credentials' => [
                    'key' => $accessKeyId,
                    'secret' => $accessKeySecret,
                ],
                'use_aws_shared_config_files' => false,
            ]);
        } catch (AwsException $e) {
            return ["error" => "AWS S3 Error: " . $e->getMessage()];  // 捕获 AWS S3 相关错误
        } catch (Exception $e) {
            return ["error" => "General Error: " . $e->getMessage()];  // 捕获其他一般错误
        }

        try {
            // 列出 S3 存储桶中的对象
            $result = $s3Client->listObjectsV2([
                'Bucket' => $bucketName,
                'Prefix' => $imagePrefix,
            ]);

            $images = [];
            $allowedExtensions = ['jpg', 'jpeg', 'png', 'gif', 'bmp', 'webp'];  // 允许的图片扩展名

            if (isset($result['Contents'])) {
                foreach ($result['Contents'] as $object) {
                    $key = $object['Key'];
                    $extension = strtolower(pathinfo($key, PATHINFO_EXTENSION));

                    if (in_array($extension, $allowedExtensions)) {  // 过滤出图片文件
                        $images[] = $key;
                    }
                }
            }

            if (empty($images)) {
                return ["error" => "No image files found in the S3 bucket."];  // 如果没有找到图片,返回错误
            }

            // 随机选择一张图片
            $randomImage = $images[array_rand($images)];
            $object = $s3Client->getObject([
                'Bucket' => $bucketName,
                'Key' => $randomImage,
            ]);

            return ["contentType" => $object['ContentType'], "body" => $object['Body']];  // 返回图片的 MIME 类型和内容

        } catch (AwsException $e) {
            return ["error" => "AWS S3 ListObjects Error: " . $e->getMessage()];  // 捕获 AWS S3 列出对象相关错误
        } catch (Exception $e) {
            return ["error" => "General Error: " . $e->getMessage()];  // 捕获其他一般错误
        }
    } elseif ($storageType == 2) {  // 如果 storageType 为 2,则使用 OSS
        // 提取 OSS 配置信息
        $bucketName = $ossConfig['bucketName'];
        $endpoint = $ossConfig['endpoint'];
        $accessKeyId = $ossConfig['accessKeyId'];
        $accessKeySecret = $ossConfig['accessKeySecret'];

        try {
            // 创建 OSS 客户端实例
            $ossClient = new OssClient($accessKeyId, $accessKeySecret, $endpoint);
        } catch (OssException $e) {
            return ["error" => "OSS Error: " . $e->getMessage()];  // 捕获 OSS 相关错误
        } catch (Exception $e) {
            return ["error" => "General Error: " . $e->getMessage()];  // 捕获其他一般错误
        }

        try {
            // 列出 OSS 存储桶中的对象
            $listObjectInfo = $ossClient->listObjects($bucketName, [
                'prefix' => $imagePrefix,
            ]);

            $images = [];
            $allowedExtensions = ['jpg', 'jpeg', 'png', 'gif', 'bmp', 'webp'];  // 允许的图片扩展名

            if ($listObjectInfo->getObjectList()) {
                foreach ($listObjectInfo->getObjectList() as $objectInfo) {
                    $key = $objectInfo->getKey();
                    $extension = strtolower(pathinfo($key, PATHINFO_EXTENSION));

                    if (in_array($extension, $allowedExtensions)) {  // 过滤出图片文件
                        $images[] = $key;
                    }
                }
            }

            if (empty($images)) {
                return ["error" => "No image files found in the OSS bucket."];  // 如果没有找到图片,返回错误
            }

            // 随机选择一张图片
            $randomImage = $images[array_rand($images)];
            $object = $ossClient->getObject($bucketName, $randomImage);

            return ["contentType" => $ossClient->getObjectMeta($bucketName, $randomImage)['content-type'], "body" => $object];  // 返回图片的 MIME 类型和内容

        } catch (OssException $e) {
            return ["error" => "OSS ListObjects Error: " . $e->getMessage()];  // 捕获 OSS 列出对象相关错误
        } catch (Exception $e) {
            return ["error" => "General Error: " . $e->getMessage()];  // 捕获其他一般错误
        }
    }
}

// 获取随机图片的数据
$imageData = fetchImage($storageType, $s3Config, $ossConfig, $imagePrefix);

// 如果发生错误,显示错误信息
if (isset($imageData['error'])) {
    displayMessage($imageData['error']);
} else {
    // 输出图片的 MIME 类型和内容
    header('Content-Type: ' . $imageData['contentType']);
    echo $imageData['body'];
}

// 显示错误信息的方法
function displayMessage($message)
{
    require_once 'error.php';
}
composer.json
这一部分就是使用composer来安装AWS S3以及阿里OSS的SDK配置文件
{
    "require": {
        "aws/aws-sdk-php": "^3.0",
        "aliyuncs/oss-sdk-php": "^2.0"
    }
}
完成上述文件创建,我们就可以正式开始进入搭建了
本教程使用Alist中的S3协议进行搭建对接的123云盘
1,先进入Alist的官网安装并运行,由于网络上此教程太多,我这边不过多教学,官网的一键安装也十分方便(Alist官网地址:alist.nn.ci)
2,进入Alist后台->存储->添加 来添加存储,我们以123pan为例
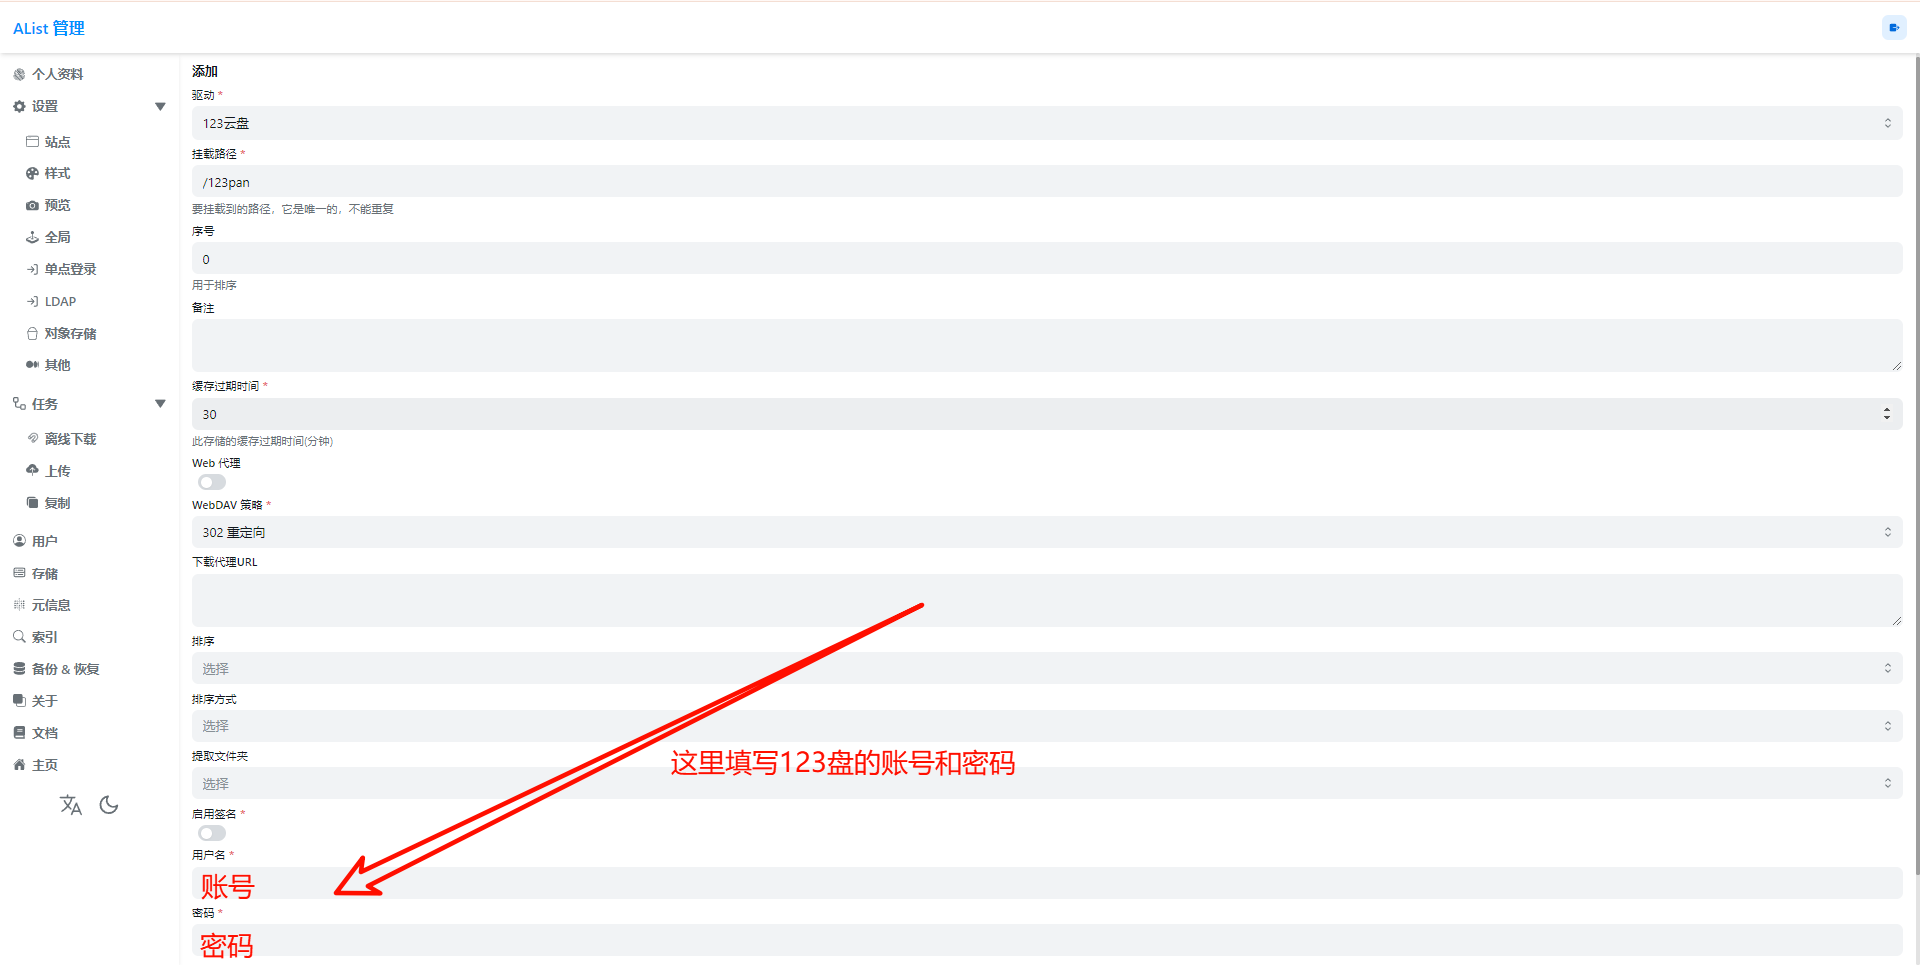
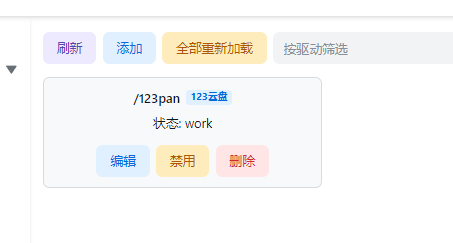
3,成功添加
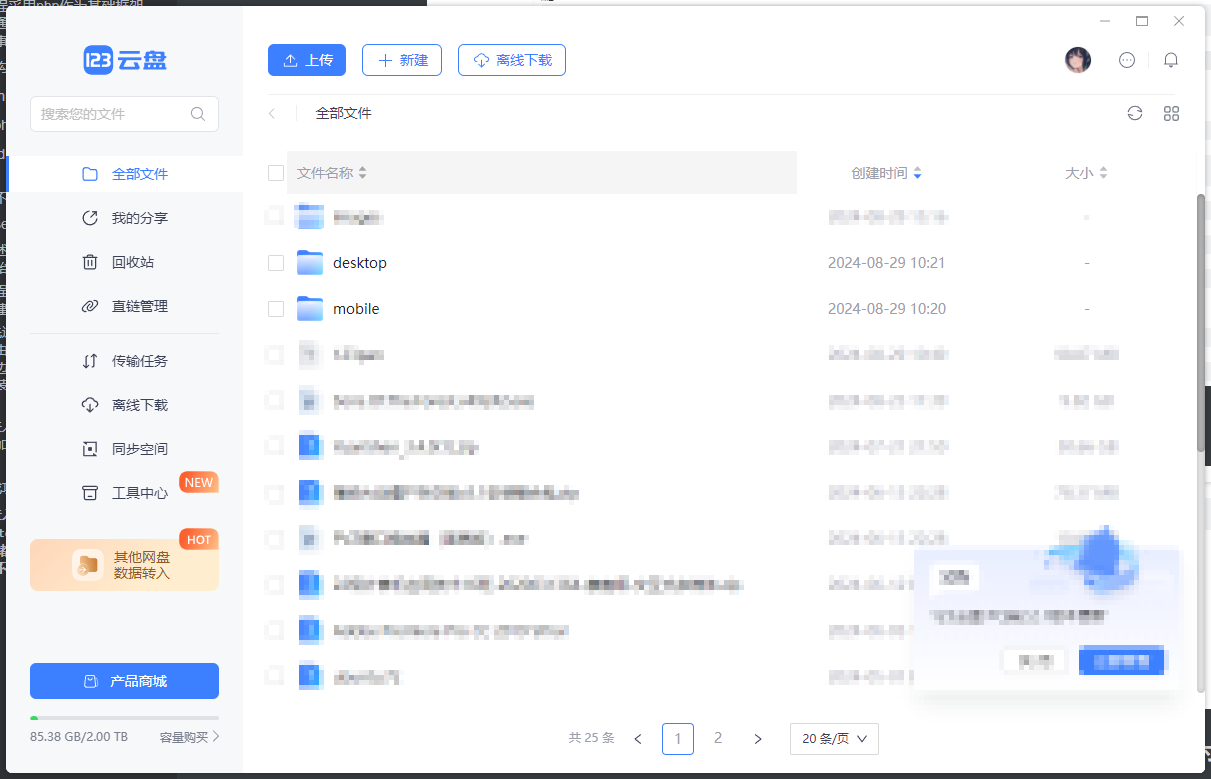
4,进入123盘,在根目录新建desktop以及mobile文件夹用于存储手机和电脑访问时候呈现出不同尺寸的图片,并且检查是否正常创建
5,进入Alist后台创建S3协议的密钥以及id
在设置 -> 对象存储中点击S3 generate来创建 Key,在下方添加桶以及位置
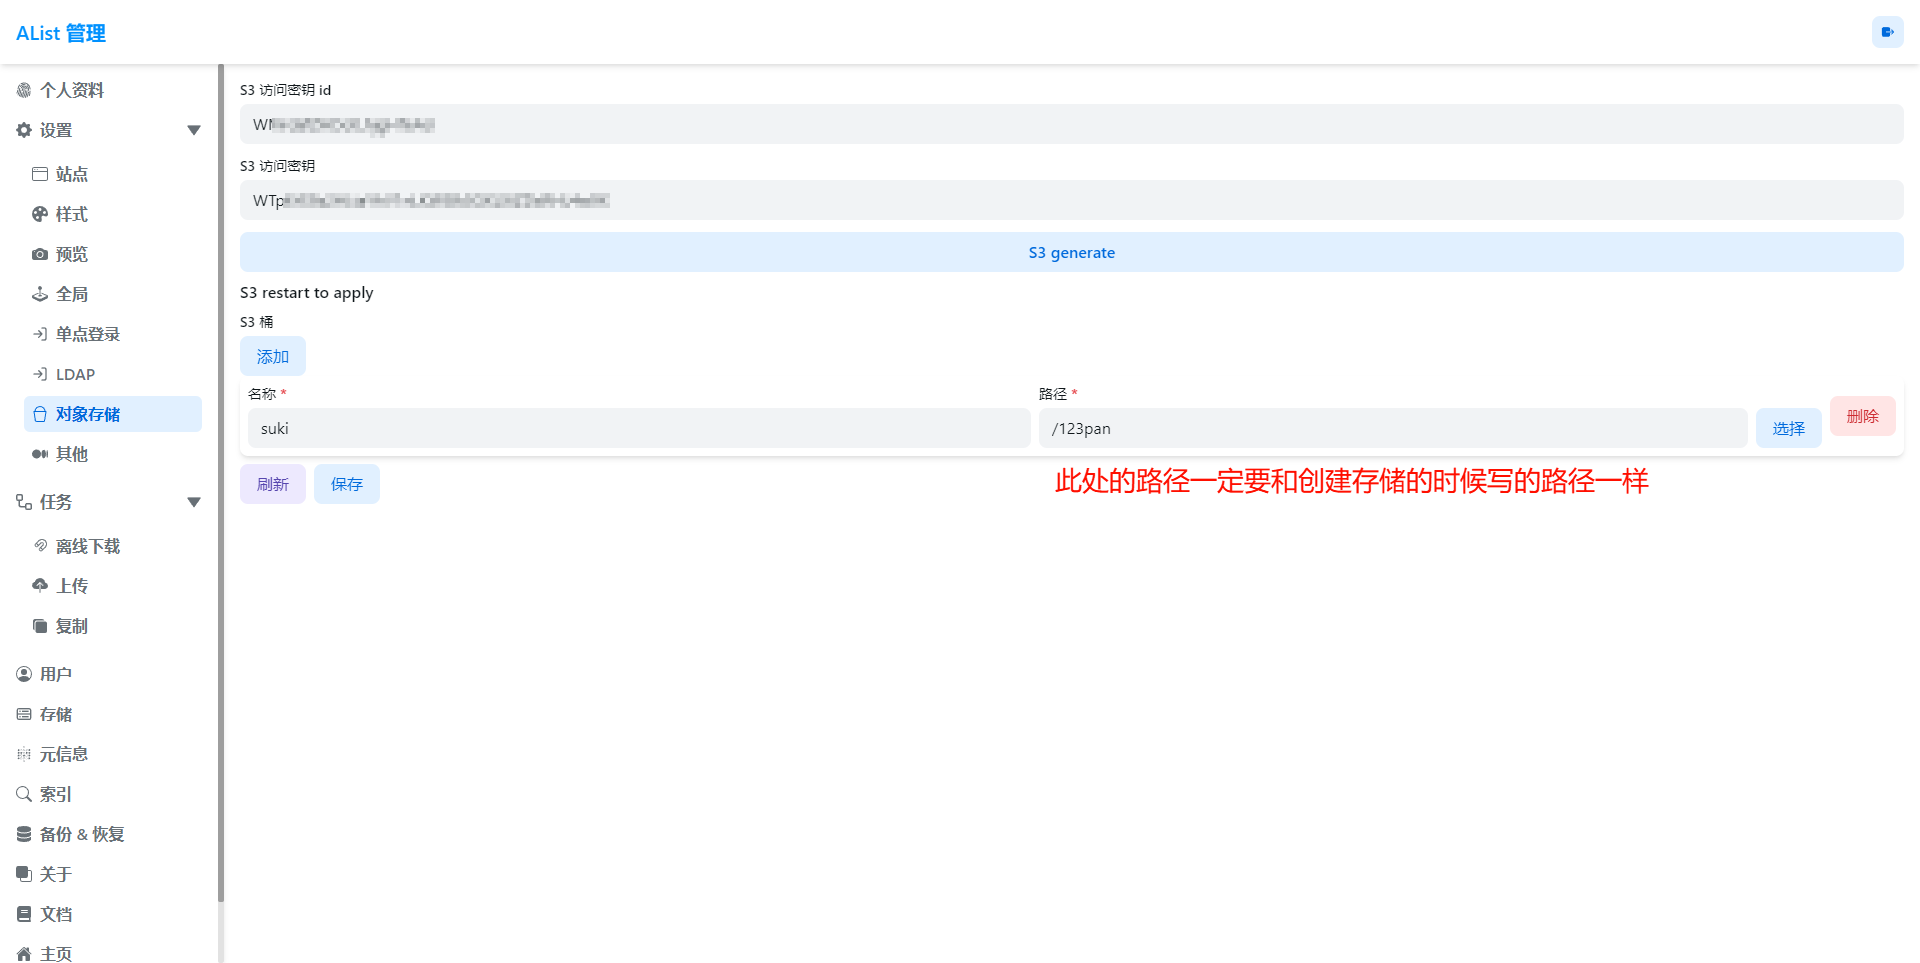
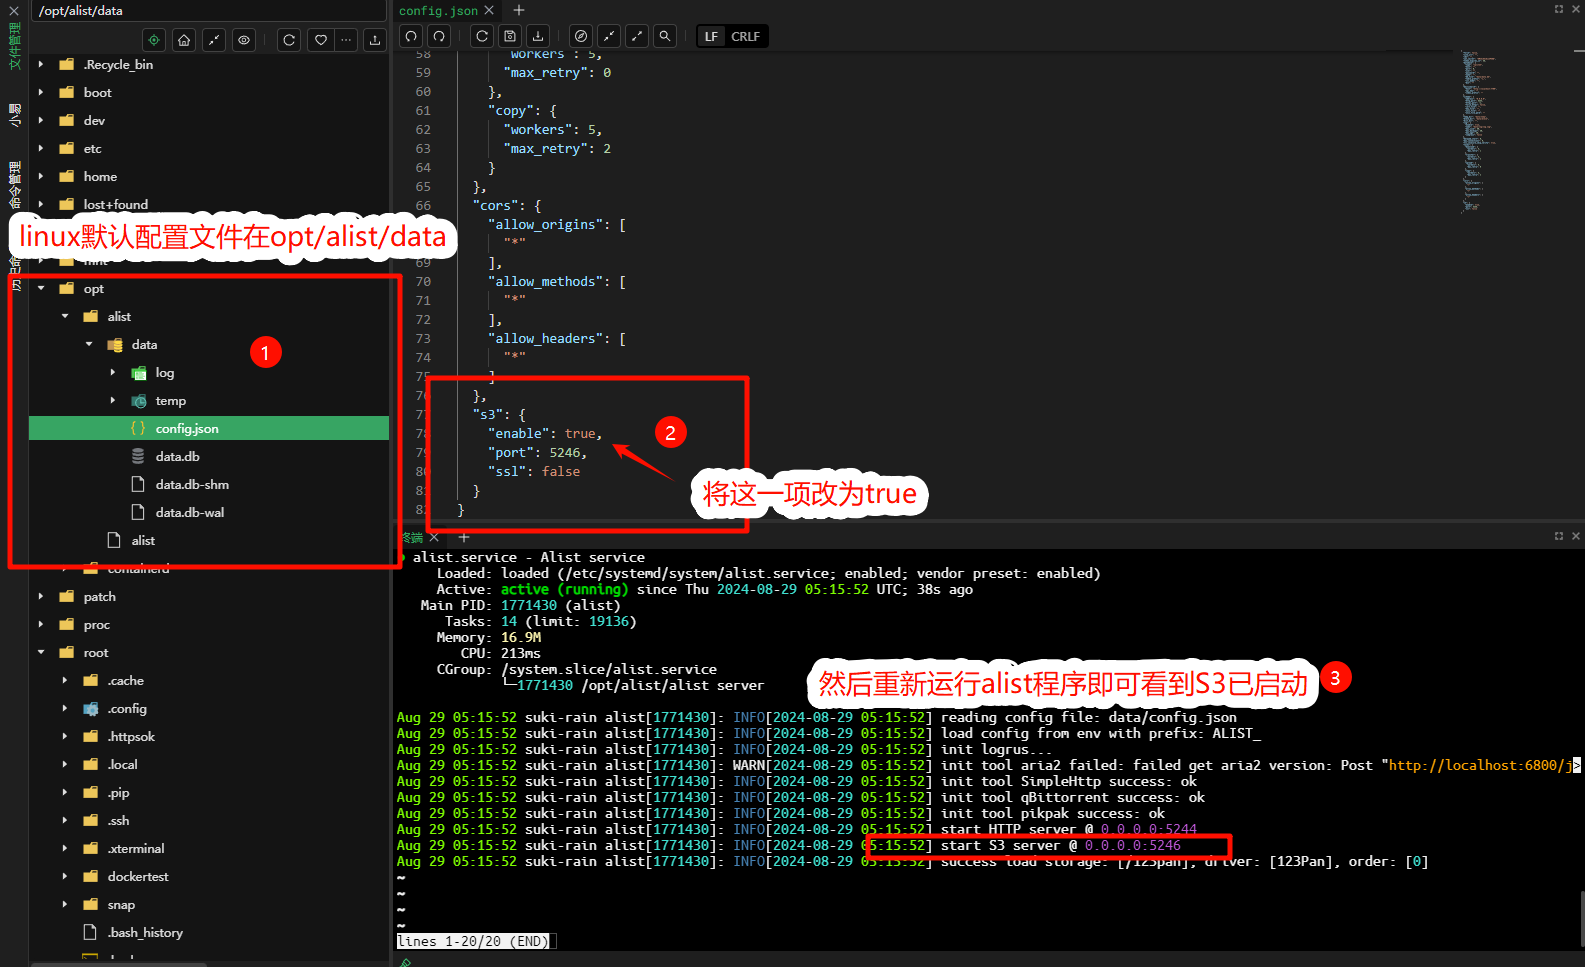
配置完成后去 Alist 的配置文件位置修改配置文件让他启用 S3 服务
6,将源码放到带有nginx,php8.0以上的web服务器中
首先我们需要安装对应的 sdk,我们需要安装 composer 程序,然后在文件目录运行
composer install
安装完成之后修改 config.php 中的配置文件
注意这里的 endpoint 需要带上端口!
此时我们访问网站即可正常看到图片


评论
匿名评论
隐私政策
你无需删除空行,直接评论以获取最佳展示效果